Last week, I attended a plant propagation workshop just up the road at our neighborhoods’ own kick butt permaculture farm, Seven Seeds Farm. Seven Seeds is a diverse operation: they raise produce, tree crops, chickens, ducks, sheep and goats, as well as being the home base for Siskiyou Seeds, a new bio regional seed company here in southern Oregon. Don can be found online at Seven Seeds Farm and Siskiyou Seeds. As an aspiring land wizard, their series of cascading ponds, contour swales and abundant food production is really inspiring, but back to the topic here…
Propagation is one of those super important, but perhaps overlooked, skills to carry in one’s tool box of techniques and know-how. I may be preaching to the choir here, but imagine being able to create dozens of new plants from a singe mother tree, or to take a particularly vigorous or unique wild plant and bring in back to your home garden. Pretty damn cool in my opinion. Especially for tight hedgerow plantings or nitrogen fixing shrubs which one could potentially need a lot of, being able to grow one’s own nursery stock can make a lot more sense than buying hundreds of nursery grown plants.
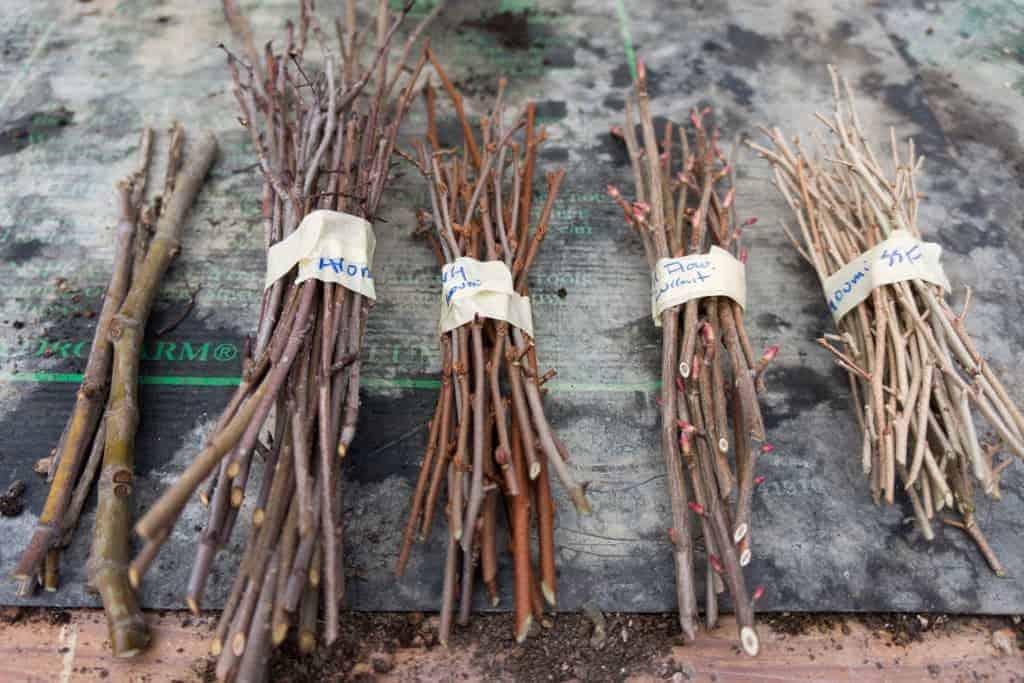
Just to let you know where I’m at with propagation, this is the first time I’ve taken hardwood cuttings. So it’s definitely an experiment for me. Besides basic seed starting and transplanting of annuals and some perennials, I’ve propagated rosemary, comfrey, goldenrod, and mint, so nothing too fancy or difficult. Based on Don’s explanations, the process is pretty simple:
1. Take a cutting from desired plant during the dormant season. According to this page, cuttings are best taken just after leaf fall or just before bud break in spring, but I have no direct experience here, and would go for it even if I missed these windows.
- Cutting should be from the most recent years growth (usually you can tell first year growth from second year by color and/or branch thickness)
- Cutting should be around 6″ long with 4-8 buds
- Remove any leaves
- Sharp tools minimize tissue damage and promote successful propagation.
- I made an angle cut at the bottom of each cutting, and a flat (horizontal ) cut at the top of each. Interestingly, this page recommends just the opposite arrangement (flat on bottom, angled on top), so either I heard Don wrong or it simply works either way. I think the thing to remember here is simply to know which side is the top and which the bottom.
- Bundle cuttings of each type with masking tape and a label.
Tip: One way to insure a good supply of new growth for cuttings is to prune hard the year before taking cuttings. This will invigorate your plant!
[images lightbox=”no”]
[image link=”” linktarget=”_self” image=”https://thetoolmerchants.com/wp-content/uploads/2013/12/Plant-Propagation-1.jpg” alt=”How to take hardwood cuttings”]
[image link=”” linktarget=”_self” image=”https://thetoolmerchants.com/wp-content/uploads/2013/12/Plant-Propagation-2.jpg” alt=”how to propagate perennials”]
[image link=”” linktarget=”_self” image=”https://thetoolmerchants.com/wp-content/uploads/2013/12/Plant-Propation-3.jpg” alt=”how to take hardwood cuttings”]
[/images]
2. Bury your bundled cuttings in moist sand or perlite in a cold location. I have mine inside our greenhouse under a potting table so it doesn’t warm up much if it’s sunny. I believe that cover is a good idea so your cuttings don’t get soaked and rot.
- I used a deep nursery tray, with a layer of cardboard on the bottom to hold in the sand. I did not wash the sand, nor did Dip any part of the cutting in a sterilizer or rooting hormone. The propagation page mentioned above recommends burying cuttings almost to their full depth, but per Don’s suggestion, I am burying them horizontally and completely. You could also use a 5 gallon bucket as a container.
- I poured in a layer of moist sand, then added the cuttings, then covered with sand. Pretty straightforward.
The next steps will come in February when things begin to warm up here. The cuttings will come out of their sandy grave, and be placed upright in pots (many cuttings per pot). Then, in the months to follow, any cuttings that root and start to leaf out will be placed either in its own pot, or in a nursery bed (hopefully the latter for me). After a year of growing in the nursery bed, they can be transplanted out to a permanent location.
I will keep you updated on this project as it develops. Until then, tell me about your experiences with propagation. Do you have a system that you like? If your new to it, was this post helpful? Your feedback is appreciated.
Until next time,
Matt